|
|
|
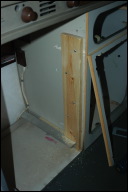
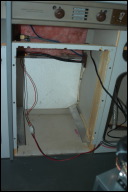
| Picture 1 - Support Structure for the Truck Fridge
Following the advice of some of the folks on theSamba I picked up 2 14" pieces of 3/16 aluminum angle iron, 2X2. It is attached with 1" #10 screws. It sits on the bottom of the cabinet, and against the small support blocks in the cabinet. If you could find 3x2 it would be a little better, as the rubber feet on the fridge are only about 2/3 on the 2x2. But, it works great, and the 2" above the cabinet floor is perfect for the old fridge grate to allow air space.
A peice of 1/4 pine was used as extra backing for holding the fridge in place. You have to notch the bottom to accomodate the 14" angle iron and give yourself a place to screw the grate on when completed. It is held on with 1.5" #8 screws - 6 per side. That does not penatrate the cabinet on either side. |
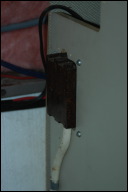
Picture 2 - Moved Outlet
The fridge outlet moved out of the fridge cabinet. You have to do something as the outlet box will hit the new fridge where it is located. Another piece of 1X4 was employed to moving it about 7/8" into the sink cabinet. See picture 8 below for the front view of the outlet. Be smart - not like what I did. Just take the outlet out and trace the whole. Cut it carefully, including the bumps for the mounting screws to stick through.
I used some 1 1/4 " wood screws from the fridge side to hold the new mount on the cabinet. If you have never done it take the extra $1.49 and buy a new outlet when you reinstall it. A 20+ year old outlet is likely not that great
Be careful not to make the new mount too large for the shelf to fit in the sink cabinet - it is pretty tight to the outlet. |
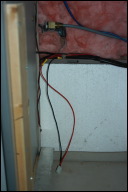
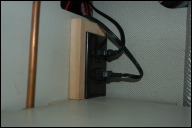
Picture 3 - DC Power for Truck Fridge
I taped back all the old fridge DC and pushed it behind the back wall. It is out of the way. The new fridge power is a new 12 guage bit of wire from my house battery fuse block. A 10A fuse is plenty on that line.
|
|
|
|
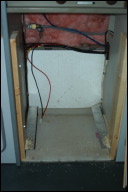
| Picture 4 - Rough opening with power for Truck Fridge
Note the domestic water inlet was not moved. It was covered with a small piece of foam pipe insulation for noise. With the new fridge only 2" off the bottom of the cabinet, it was not necessary to move it. |
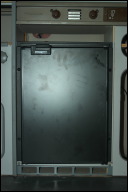
Picture 5 - Rough opening with repurposed facial cut for Truck Fridge
A bit of tricky sawing with a saber saw. Use the old fridge facia and make a new whole for the new fridge. You can see there are screws all the way around, so make the notches as you need to it. Be careful of the laminate. If you cover it with painters tape and use an 18 or 24 TPI blade you should keep from splitting it open.
You also need to cut a notch for the two tabs that function for the hinge mount. Save the bottom of the old fridge and use it to fill the top of the lower fridge grate. You mount two screws from the back, then drill new holes about 1/4" wider in the old grate. I used two of the old fridge screws and grey caps to hold it in place. It has to go on last as the rubber feet will not pass with it in place. |
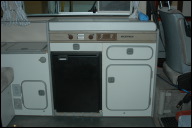
Picture 6 - Truck Fridge in place
The fridge completely installed. Note the lower grate and the grate on the side of the cabinet were stripped and painted with Ace brand rust paint. Plain Grey was the color. Makes a big difference |
|
|
|
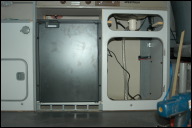
| Picture 7 - Whole Cabinet
A view of the whole cabinet |
Picture 8 - Under sink, outlet showing on new mount
Front of the new outlet mount - complete with new outlet! |
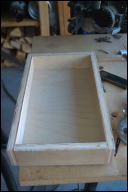
Picture 9 - Drawer Body
You can do anything to take up the additional space. I decided on a shallow drawer that would allow full venting of the new fridge. The drawer body is about 9" deep and 2 3/4" high. Not a huge drawer, but all the space counts!
The inside of the drawer was coated with spray poly to allow quick clean up. |

|

|
|
| Picture 10 - Customized Drawer slides
Could not get 9" drawer slides, so 14" were cut down with a hack saw |
Picture 11 - Drawer with latch and front face from old fridge door
I had help from a very skillled wood working friend for this drawer - especially the intricate work like reusing the old fridge face and latch for the drawer. Thanks WR |
Picture 12 - Completed
Project complete. |